Roosevelt Dimes
1946-1964
For any individual with an interest in coin collecting, the Roosevelt dime series offers an exciting opportunity to take part in the science, study and enjoyment of the hobby.
There is no doubt that Franklin D. Roosevelt was a popular president. His death, during a time of intense national pride and patriotism, brought forth a tremendous outpouring of emotion. As part of this reaction, Treasury officials proposed that Roosevelt's likeness be adopted for immediate use on the U.S. dime.
The job of designing this coin was assigned to the Mint Chief Engraver, John R. Sinnock. Several designs were submitted to the Commission of Fine Arts for approval or comment, and based on feedback from this body, a design was soon found which was accepted by then Secretary of the Treasury, Fred Vinson. Production of the new Roosevelt dime began without delay. Specific details about the commission's recommendations and photos of the early design models can be found in Don Taxay's text titled U.S. Mint and Coinage: An Illustrated History from 1776 to the Present.
The obverse design chosen for the Roosevelt dime has always evoked controversy among numismatists, as well as other interested parties, with regard to its origin. Recognition for the creation of the design has officially been given to Sinnock. There is, however, an allegation that the obverse design is little more than a copy of an existing drawing and sculpture of Roosevelt made by artist Selma Burke. Burke was commissioned to create a profile of Roosevelt for a bas relief plaque which was to be placed in the Recorder of Deeds office in Washington, D.C. Her plaque was officially unveiled on Sept. 24, 1945. It is Burke's contention that Sinnock used her work as the basis for his obverse design.
In general, Burke's profiles of Roosevelt are similar to that found on the dime. They face left, have the same angle of cut on the neck, and certainly look like Roosevelt. They are, however, not exactly the same. Burke's drawing of Roosevelt is different in that it portrays a younger looking man than found on the dime. It is also different in that her drawing does not portray Roosevelt directly from the side. Burke's drawing allows the viewer to see a few of the right side features of Roosevelt's face in addition to the left side details. The bas relief sculpture of Roosevelt also seems to be proportionately different, although close in detail to that of the dime.
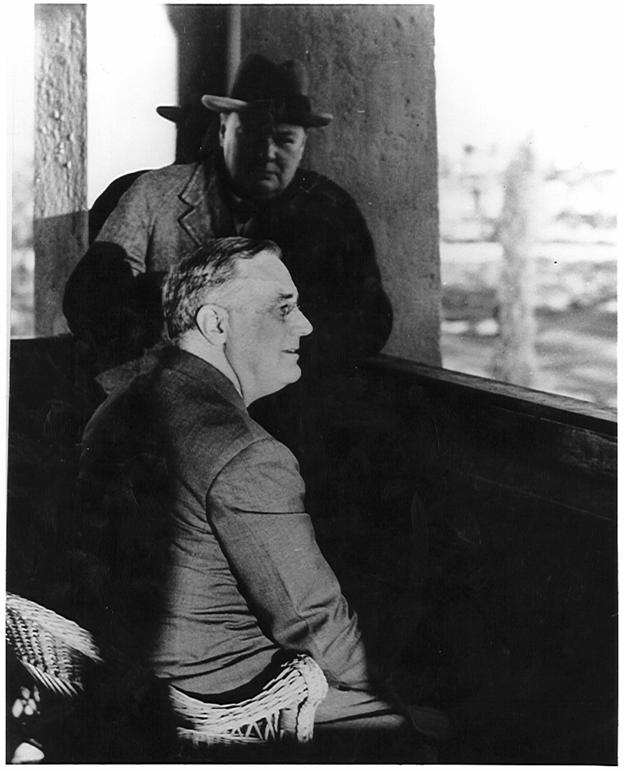
While the argument over who deserves credit for the obverse design of the Roosevelt dime may never be resolved, it does seem realistic to suggest that Sinnock probably used all of the resources available to him at the time to aid him in his effort. It is known that Sinnock had done his own studies of Roosevelt prior to being given the job of designing the new dime. These earlier studies were done in connection with the design of a 1933 Mint medal marking the president's inauguration. It also seems realistic to think that a true side profile of the president would be a lot easier to "copy" or use as a model than one (Burke's) that presented the president from a slightly different angle. On the following page, one of the many photographs taken of Roosevelt during World War II is presented. With some scrutiny, it is found to have the exact profile (reverse negative) as that used by Sinnock for the approved design on the dime. Coincidence? Perhaps, but it is more than likely that no definitive answer will ever be established as to the origin of Sinnock's design. Perhaps it is fairest to believe that the design on the obverse of the Roosevelt dime, as engraved by Sinnock, was arrived at after consulting several studies, Burke's work among them.
The Collection
Roosevelt dimes can be collected and assembled using a variety of formats. Depending on the needs and interests of the individual numismatist, collecting Roosevelt dimes can range from an easy, short term project to a detailed, lifelong endeavor.
Without much debate, it can be safely stated that the most popular way of collecting Roosevelt dimes is by date and mint. This type of collection will contain a coin struck at each mint for every year that the coin was produced. To illustrate, during the years from 1946 through 1955, the Roosevelt dime was struck at the Philadelphia, Denver and San Francisco mints. From 1956 through 1964 they were struck at the Philadelphia and Denver mints. A complete date and mint set of Roosevelt dimes for these years would include three coins from the year 1946; one from the Philadelphia Mint, one from the Denver Mint, and one from the San Francisco Mint. The set would include three coins from 1947, 1948, etc. through 1955 in the same manner. From 1956 through 1964, the set would have two coins from each year; one from the Philadelphia Mint and one from the Denver Mint. In total, the set would contain 48 coins from those 19 years of production.
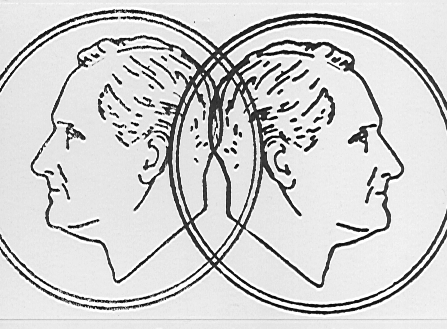
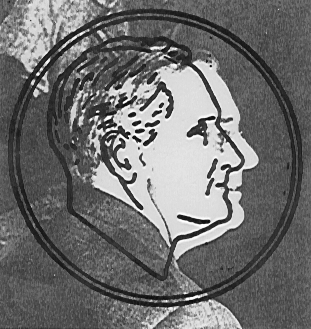
It seems well within reason that photographs, perhaps this one in particular, may
have given Sinnock a good deal of his design inspiration.
A reversed dime profile.
Overlay—slightly offset to show duplication of details.
In addition to collecting the Roosevelt dime by date and mint, there are several other collectible aspects of this series. The three which are most popular are the collection of Repunched Mint Marks, of Over Mint Marks, and of Doubled Die varieties.
A Repunched Mint Mark (RPM) occurs when a mint mark is added to a working die. Prior to the addition of the mint mark, all dies are intended to be identical. All of the working dies used in the production of Roosevelt dimes are manufactured at the Philadelphia Mint. The mint mark is then added as the final step in the preparation of dies destined for use at either the Denver Mint or the San Francisco Mint. The Philadelphia Mint did not use a mint mark to identify itself as the producer of Roosevelt dimes during the 1946-1964 period. Mint marks were added to the working dies individually by hand using a letter punch and mallet. In this process, several taps of the mallet were often necessary for a mint mark to be successfully applied to a die. If the letter punch were inadvertently moved out of alignment with the impression made by the first or subsequent blows to the punch, then a repunched mint mark resulted. The more often the mallet was used to strike the letter punch in setting the mint mark into the die the more often chances of creating a multiple mint mark (RPM) occurred. Triple and quadruple mintmarks are not uncommon for this reason.
An Over Mint Mark (OMM) is also created during the process of adding the mint mark to a working die. In the case of an OMM, however, a different mint mark letter is punched over the original mint mark letter. An example would be the "S" used for the San Francisco Mint being punched over the "D" used for the Denver Mint. Remnants of the "D" would still be visible under the "S" as the two letters do not have the same shape. It is reported that there are two different OMM's for the 1947-S dime and one OMM for the 1950-S dime.
One of the most intricate and demanding areas of collecting and cataloguing is that of identifying and numbering doubled die varieties. Technically, RPM's and OMM's are doubled dies, but because the doubling to the die was created by hand during the application of the mint mark, these types of varieties are considered apart from those varieties collectively referred to as Doubled Dies.
To better understand what a doubled die is and how it occurs, it is beneficial to have some understanding of how the dies that produced the Roosevelt coins were made. The following paragraphs are offered as a brief explanation of this procedure.
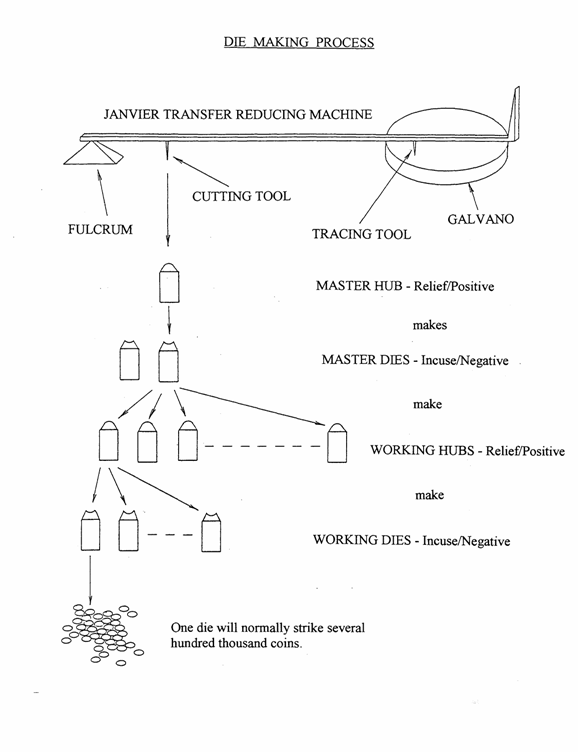
When the politics and preliminary hoopla of coin design have been completed and the final design, usually a drawing or sketch, for a specific coin has been chosen, a model of wax or some other suitable material is made in the likeness of the chosen design. This model is usually several times larger than the intended size of the proposed coin. This larger size helps the engraver create the exact detail needed on the model with more precision and with more ease than if the design were attempted in actual size. From this model, a plaster cast is made. When parted from the model, the finished surface of this plaster cast is a "negative" of the original design. The likeness of this cast may be thought of as looking much like the inside surface of a mask. Using this plaster "negative" as a model, a "positive" plaster cast is made of it. This "positive" hard plaster cast is then checked to insure that it will make an acceptable model. If found to be acceptable and a final approval for its use is obtained, one last "negative" plaster cast is made from it. To recreate the original coin design, this finished "negative" plaster cast is then electroplated with several alternating layers of copper and nickel. The layer of electroplated metal is then backed up or reinforced with a heavier metal to give it strength and make it rigid. With the plaster removed from this metal cast, a finished metallic model like the original "wax" sculpture remains. This finished model is known as a "Galvano" plate. The word galvano indicates or defines that something was caused by an electric current. This "Galvano" plate will serve as the final model from which the eventual coin producing dies will be fashioned.
The next step in die manufacture is the reduction of design size from that of the galvano to that required by the finished coin. This task is accomplished by a machine known as a Janvier Reducing Machine. This machine copies or follows the shape of the galvano and proportionally reduces this shape to the desired size while cutting the design into the end of a cylindrical steel bar. The end of this steel bar, which happens to be the size of the desired coin, is now an exact copy of the galvano in reduced size. This steel bar is known as the Master Hub. When complete, the steel of the Master Hub is heated, oil quenched, and tempered to a hardened state.
The Master Hub is now used to make a Master Die. This is done by pressing the Master Hub into the end of a softened steel bar. The force necessary to do this is provided by a press. The process of pressing a hub into the steel bar which will become a die is called "hubbing". Although the steel used to make the Master Die is softened, it is often necessary that multiple hubbings are needed to make an acceptable impression on the die. There is also some metallurgical thinking that suggests the additional hubbing will also enhance die life. When the hubbing process is finished the steel of the new Master Die is hardened.
The purpose of a master die is to make several "Working Hubs". These working hubs are then used to make many "Working Dies". Working dies are the ones which actually strike the coins. The process for making working hubs and working dies is the same as that process used for master dies just described.
The practice of making working hubs and dies from a master hub and a master die is necessary to insure that a master hub or die will not appreciably deteriorate with use. This practice helps preserve the quality and consistency of design over long periods of coin production.
Doubled dies create coins which exhibit doubled characteristics. Any feature of a coin can show this doubling. Depending on which die was doubled, sometimes obverse details might be doubled, sometimes reverse details might be doubled, and less often both sides of a coin may show doubling.
Doubled dies are created during the hubbing process. A hub doubled die results from the misalignment of images on the hub and the die during hubing. Simply put, this is when the image on the hub is pressed into the image on the die at a time when the two are not properly aligned. This misalignment can be caused in different ways and several identifiable causes have been defined. As more information is gathered and more research is conducted it is quite possible that other causes and explanations for doubled dies will be forthcoming. Currently, there are eight accepted classes or reasons of how doubled dies occur. Each class has its own particular characteristics. Each cause has a different type of effect. No doubled dies are the same. The following is a list of these different types of doubled dies and a brief description of each. This classification system has been adopted by CONECA and is used as an aid to identify specific doubled die errors. This system is rigorous and has been well accepted by the most respected researchers of U.S. coinage. All of the doubled die listings in this text come from the CONECA files of catalogued doubled die coins.
Class I - Rotated Hub Doubling
Dies are routinely removed from presses between hubbings so that the steel from which they are made can be softened by the process of annealing. Hubs are removed from presses much less often than dies are. When the die or hub is returned to the press for the next hubbing, it must be returned to the precise position it was in prior to being removed. If it is not, then a misalignment of the die and the hub occurs. In this state, if the hub is pressed into the die again, the result will be two separate overlapping images of the die details. Because a die or hub will pivot (turn like a wheel) around, its center, the resulting spread or doubling of details will be greater toward the rim than it will be near the center. This misalignment is described as being either clockwise (CW) or counterclockwise (CCW) depending on the direction of the second or misaligned hubbing.
Class II - Distorted Hub Doubling
Coins which display this class of doubling are manufactured from dies which become distorted during the heat treating process of annealing or tempering. If a die which has become distorted is returned to a press to be hubbed again, the images of the hub and distorted die will not match up and a doubling of the die will occur during the hubbing process.
Class III - Design Hub Doubling
This type of doubling occurs when a die is impressed with hubs that have different designs. Pretty simple to understand. Good examples of this type of doubling would be found on the 1942/1 Mercury Dime and the 1943/2 Jefferson Nickel.
Class IV - Offset Hub Doubling
This type of doubling occurs when the alignment of the impression being made in a die is offset in one direction from a previous impression. This misalignment can be to the north, south, southeast, or in any direction as long as the center of the hub and the center of the die are not aligned during the hubbing process. All doubling will be in he same direction and will have the same spread. An example of a coin with this type of doubling is the 1943 Double Eye Jefferson Nickel.
Class V - Pivoted Die Doubling
This class of doubling occurs when a die is pivoted in relation to a hub during the hubbing process. The point of the pivot is usually near the rim of the die and the doubling will be greatest on design elements farthest from this pivot point. Doubling will decrease when moving back toward the point of pivot from either direction. The doubling is described as being either clockwise or counterclockwise depending on which way the second impression is made. An example of this type of doubling would be found on the 1917 obverse doubled die Lincoln Cent. The doubling is strongest on the date and moderate on the motto. The doubling becomes slight on LIBERTY as the point or pivot is neared. The 1936 obverse doubled die Lincoln Cent and the 1916 obverse doubled die Buffalo Nickel are other examples.
Class VI - Distended Hub Doubling
This class of doubling occurs when the raised details on a hub become flattened and thicker than normal. The hub, in this instance, does not spread out or get bigger in diameter. When a hub of this type is pressed into a die having been impressed by a normal hub, the resulting detail will be wider than normal. This type of doubling will seldom show any separation or spread between the different images and is often difficult to identify for that reason.
Class VII - Modified Hub Doubling
This class of doubling occurs when a change is made to the master hub or master die. These changes usually involve the removal of some part of the original design that is no longer wanted. Doubling occurs when any unwanted details are not completely removed and remnants or these details are transmitted through the hubbing process to the working dies. Modified hubs, if practical, are used to make the first impressions in a die and " normal" hubs are used thereafter to complete the hubbing process.
Class VIII - Tilted Hub Doubling
This class of doubling occurs when the plane of a hub's impressing surface is not parallel to the face of the die during hubbing. The resulting impression will appear to be off center and one side will have a deeper design than the other. The amount of tilt will determine the degree of error. Doubling is strongest toward the rim and will appear as a tapering in the relief of the details. Doubling may also appear as a displacement of part of the design. This type of doubling is very unusual as it results from a "defect" in a hubbing press, a hub, or a die.
In order to identify and keep track of doubled die errors, an identification system has been developed to help catalog each different variety according to its own unique characteristics. This identification system consists of numbers and letters and is really quite easy to understand. It is comprised of several distinct parts. The following fictitious example will help illustrate what information is given by each part of the identification system as it would relate to the Roosevelt dime.
PR-3-O-II-C (3)
Prefield. Indicates the level or type of die involved.
Abbreviations are:
PR - Indicates that the doubled die is a proof die.
or
MD (Master die doubling) - Indicates that the multiple
working dies of the same year exhibit identical
doubling. Specimens may be found from all three
mints including proof issues.
or
WH (Working hub doubling) - Indicates that several
dies of the same year will exhibit the same
doubling.
or
SD (Series doubling) - Indicates that the same
doubling will occur on more than one year. This
is possible when the same hubs or dies are used
in successive years. This is possible with
Roosevelt dime reverses, but it has not yet been
verified.
PR-3-O-II-C (3)
Die or listing number. This number identifies each doubled
die example of any date and mintmark. The listing
number begins with 1 and increases with each new
doubled die authenticated.
PR-3-O-II-C (3)
Obverse (O) or reverse (R) Identification.
PR-3-O-II-C (3)
Class of doubling is indicated by this numeral.
PR-3-O-II-C (3)
Where appropriate, this letter will identify the direction
of doubling (C-toward the center, E-toward the
edge, CW-clockwise, CCW-counterclockwise).
PR-3-O-II-C (3)
When appropriate, this indicates the number of hubbings if more than two are evident.
The example [ PR-3-O-II-C (3) ] used for the above explanation would indicate a proof coin, 3 rd. obverse die, with doubling toward the center. In this particular instance, the number at the end indicates that the "doubling" is present in tripled form ( a (4) would indicate quadrupled form, a (5) would indicate quintupled form, etc.).
Hopefully, this explanation will help the reader understand the doubled die listing system as it is applied to each variety identified in this text. As stated before, collecting and identifying doubled die varieties can be intricate and demanding. Not only are sources of information sparse, they are often incomplete in that unreported and newly discovered doubled die varieties can not possibly be included in any text. It is also standard practice to update existing textual information whenever possible. Once a coin has been listed as a doubled die variety and given an identification, it is quite possible for the identification to change as more information about the coin is gathered. For example, a coin that was once thought to be a Class V doubled die may be redefined as a Class II doubled die if better examples of it can be studied and such a change seems is warranted. Identification is also made challenging by the simple fact that the dies used in the production of coins are in constant states of change. These changes occur normally during the coin producing life of dies and result for a variety of reasons. For example, as new dies are placed into use, they begin to wear.